Most WordPress sites that feel messy six months after launch have the same root problem: content went in before anyone decided where it belonged. Pages were created as posts, the blog took over the homepage, and the menu grew one link at a time.
Fixing that later is tedious. Setting it up first takes about half an hour. This guide walks through the four pieces that decide your site’s structure, in the order we recommend: pages, posts, the homepage setting and menus, plus the permalink setting that controls every URL. The screenshots come from a WordPress 7.1.2 test site using a classic theme.
Pages and posts are not interchangeable
WordPress has two built-in content types, and choosing the wrong one is the most common beginner mistake.
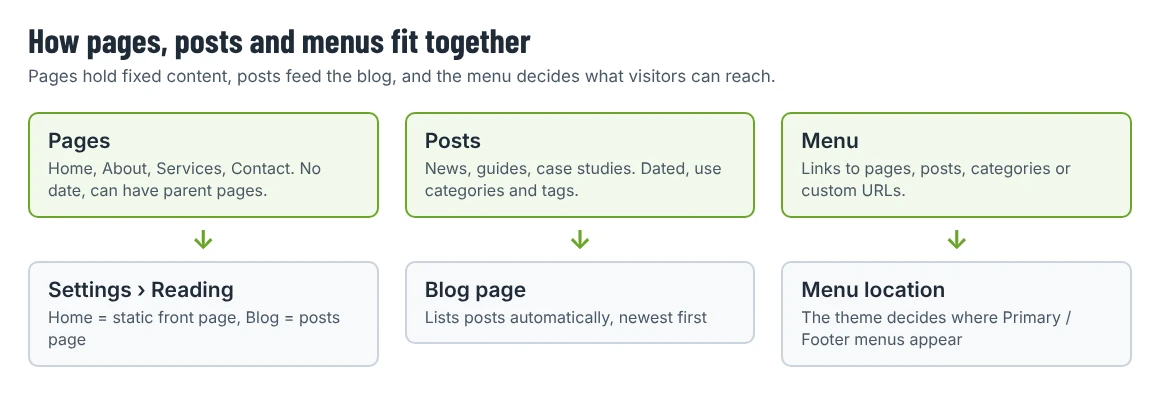
Pages are for content that doesn’t depend on a date: Home, About, Services, Contact, Pricing, a privacy policy. Pages can have parent pages (Services › Web Design), which helps both visitors and your URL structure. They don’t use categories or tags.
Posts are dated entries: news, tutorials, case studies, announcements. WordPress lists them on your blog page with the newest first, and they can be grouped with categories and tags. Posts also appear in your site’s RSS feed.
A practical test: if the content would still make sense with no date attached and you would link it from the main menu, it’s a page. If it belongs to a stream of updates, it’s a post.
Step 1: Create the core pages
Before importing a theme demo or writing blog posts, create the pages your site needs. For a small business site that usually means:
- Home – leave it nearly empty for now; you will design it later.
- About
- Services (with child pages if you offer several distinct services)
- Contact
- Blog – leave it completely empty. WordPress fills it with your posts.
Go to Pages › Add Page, enter the title, and publish. To make a child page, open the page settings sidebar in the editor and choose a Parent page.
Once the pages exist and you have completed Step 3 below, the list looks like this:
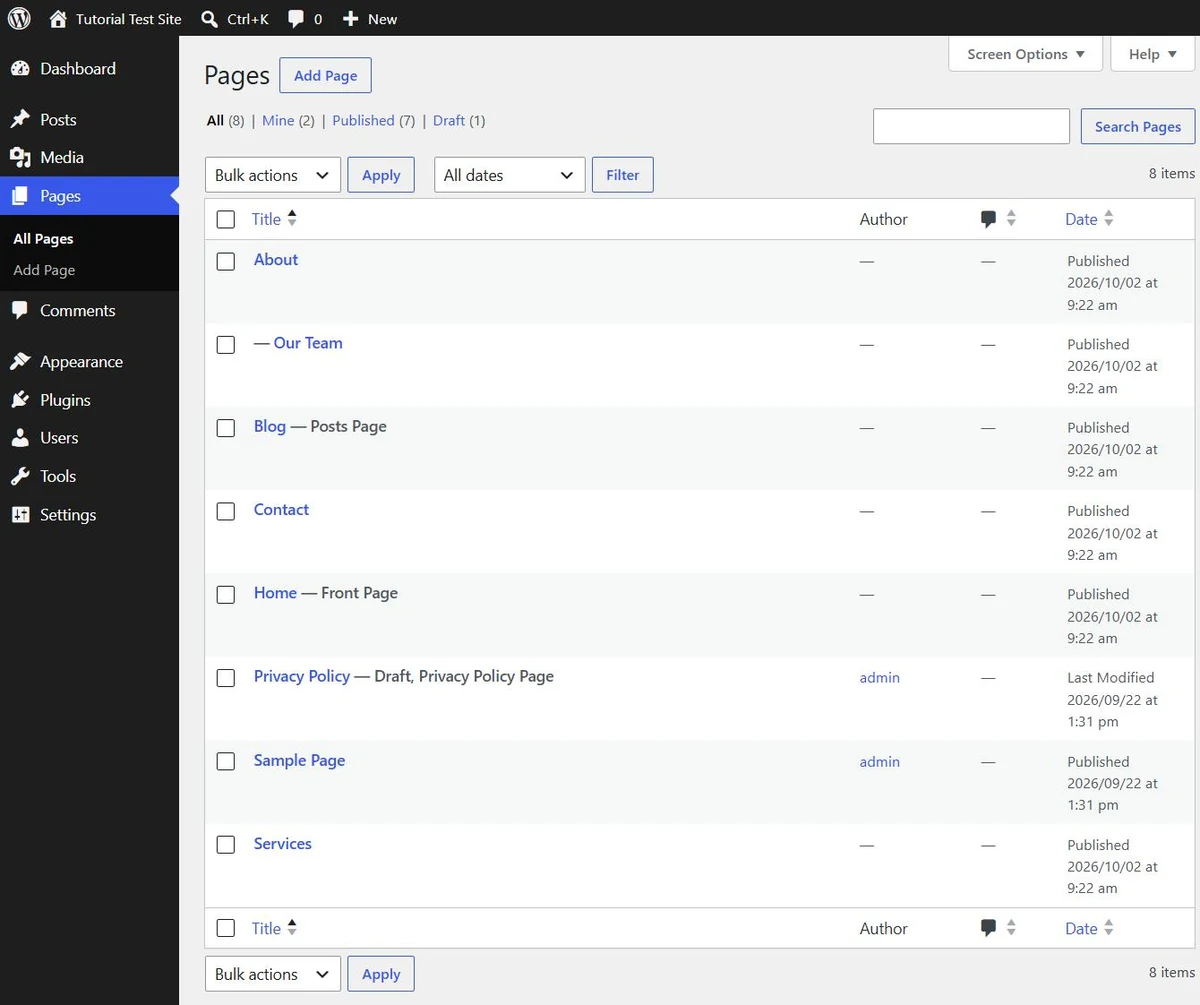
Notice the labels next to two titles: Front Page and Posts Page. WordPress adds them so you always know which pages are wired to the homepage settings. The dash before “Our Team” shows it is a child page of About.
A note if you plan to import theme demo content: many theme importers create their own pages, menus and homepage settings. Either import the demo first on a fresh site and then edit what it created, or build the structure yourself and skip the demo pages. Doing both usually leaves duplicate pages such as “Home” and “Home 2”. Our guide on installing a WordPress theme without breaking your site covers the order of operations.
Step 2: Decide what your posts are for
You don’t need to write posts on day one, but decide what the blog is for and create two to five categories that match. Categories are your blog’s table of contents; tags are optional keywords. A clear category list prevents the classic “Uncategorized” pile.
Go to Posts › Categories and rename the default “Uncategorized” category to something useful, then add the others. Keep names short and specific: “Case studies”, “Guides”, “Company news”.
Step 3: Set the homepage and the blog page
By default, WordPress shows your latest posts on the homepage. Most business sites want a designed homepage instead.
Go to Settings › Reading:
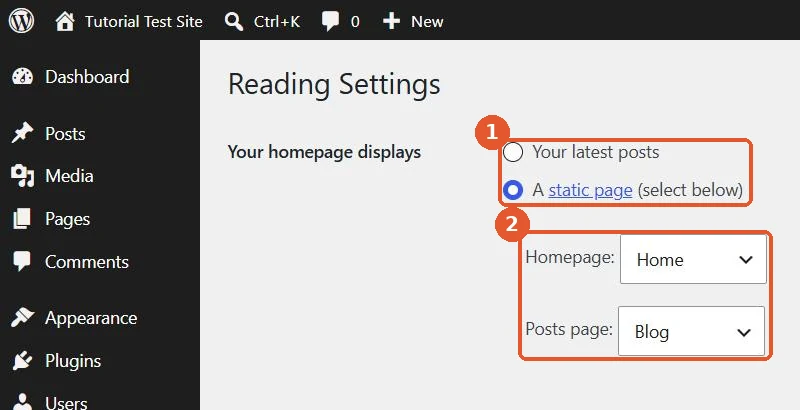
- Under Your homepage displays, select A static page.
- Set Homepage to the page called Home and Posts page to the page called Blog.
- Save the changes.
Two things to know:
- The page you choose as the posts page is a container. Anything you type into it is not shown; WordPress replaces it with the list of posts.
- Some themes, including many Elementor-based themes, design the homepage in a page builder. The setting above still decides which page is the homepage; the builder decides what is on it.
Step 4: Build the main menu
How you edit menus depends on the theme type:
- Classic themes (most premium themes built for Elementor or WPBakery, including SH Themes products) use Appearance › Menus.
- Block themes such as Twenty Twenty-Five edit navigation in Appearance › Editor, using the Navigation block.
The steps below use the classic screen.
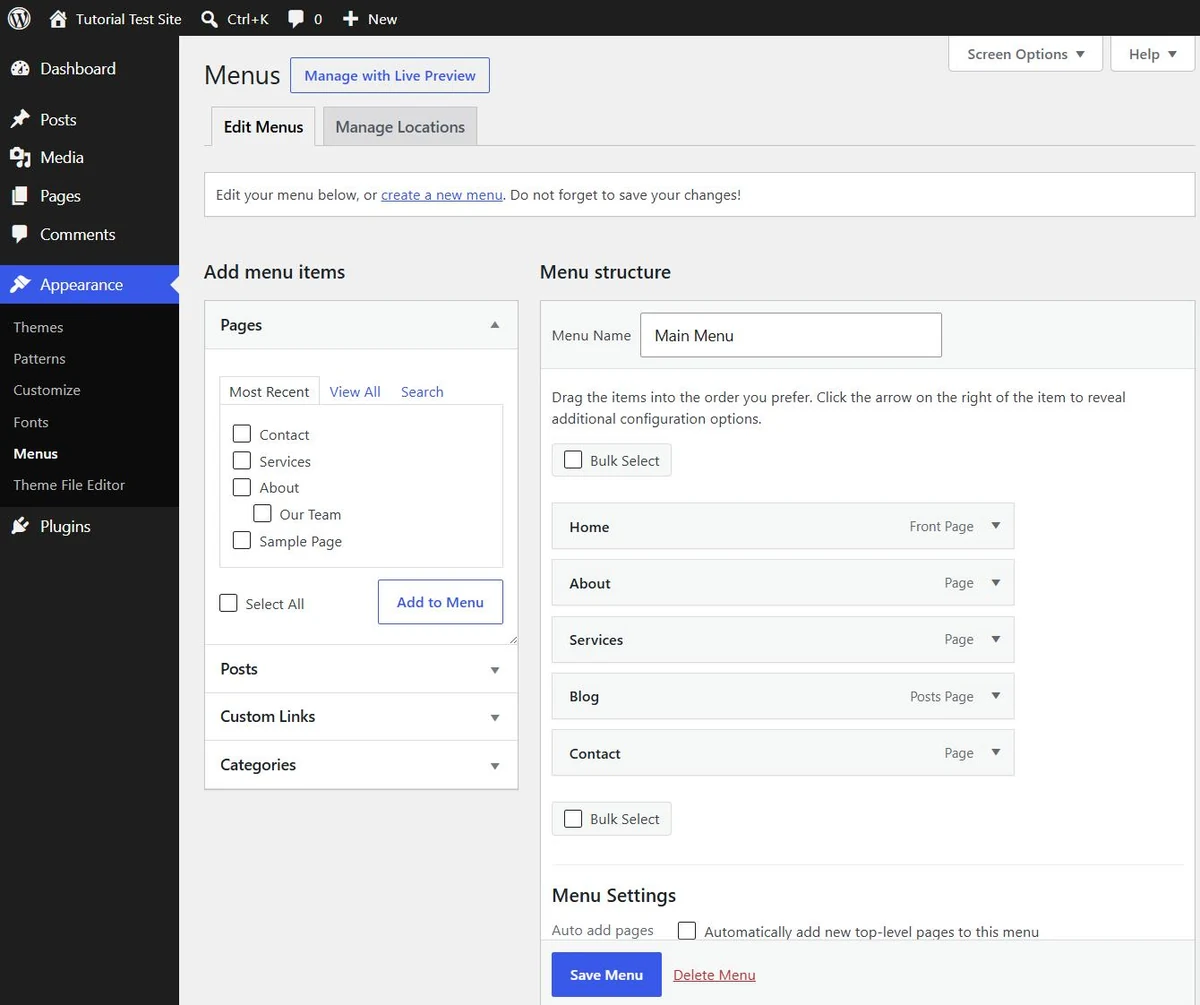
- Enter a menu name (for example “Main Menu”) and click Create Menu.
- In Add menu items on the left, tick the pages you want and click Add to Menu. You can also add posts, categories or custom links.
- Drag items to reorder them. Drag an item slightly to the right to make it a sub-item.
- Click Save Menu.
Then tell the theme where to show it. Open the Manage Locations tab:
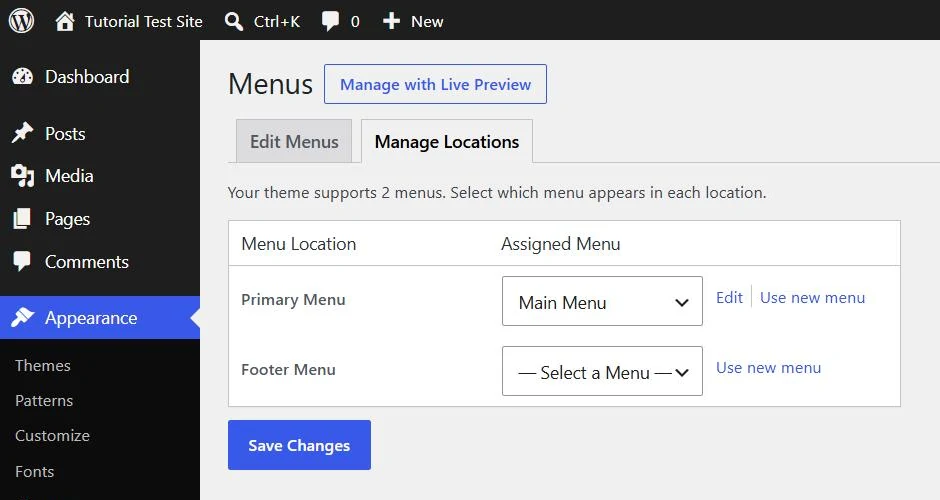
Each theme registers its own locations. The test theme here has a Primary Menu and a Footer Menu; a premium theme may add others, such as a top bar or a mobile menu. Assign your menu and save.
Keep the main menu short. Five to seven top-level items is plenty for most small sites; put legal pages and secondary links in the footer menu.
Step 5: Choose a permalink structure before you publish
Permalinks control the URLs of every post and page. Go to Settings › Permalinks:
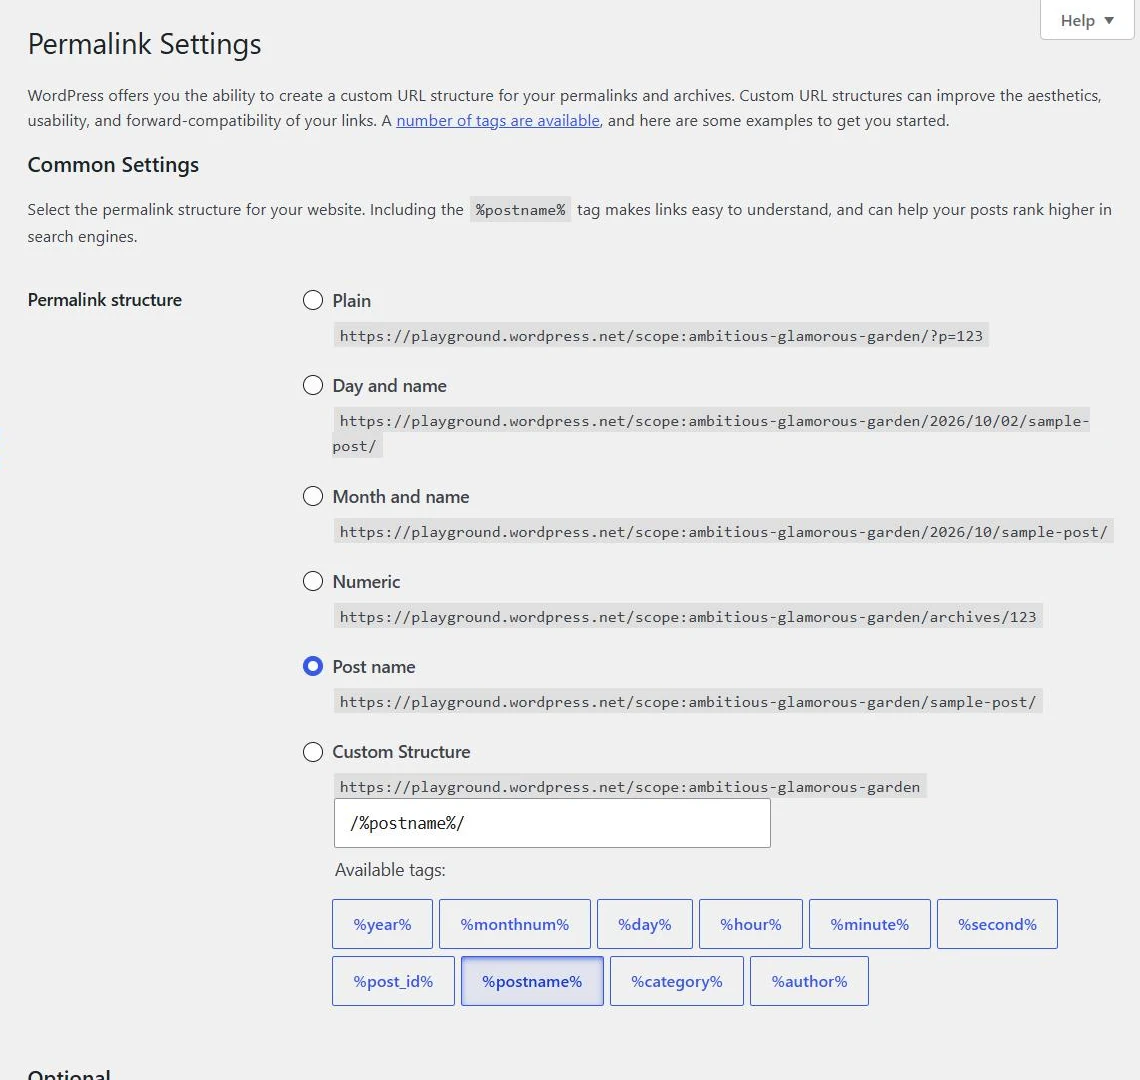
Post name (/sample-post/) is the simplest choice for most new sites: short, readable URLs that don’t reveal or depend on dates. Date-based structures make sense if your content is news and the date matters to readers.
Change this setting before you publish content. Changing it later changes every post URL. WordPress can redirect some old URLs on its own, but don’t rely on it: external links, shared links and analytics history are easier to manage if the structure never changes. If you must change it on an established site, plan redirects and check them.
A simple structure you can copy
For a small service business, this layout works well with most themes:
| Item | Type | Menu |
|---|---|---|
| Home | Page (static homepage) | Main |
| Services, with one child page per service | Pages | Main (services as sub-items) |
| About, with Our Team as a child page | Pages | Main |
| Blog | Page (posts page) | Main |
| Contact | Page | Main, with a button style if your theme supports it |
| Privacy Policy, Terms | Pages | Footer |
| Guides, Case studies, News | Post categories | Optional, in the footer or on the blog page |
Common mistakes
- Writing evergreen content as posts. Services and About pages end up buried in the blog with a date that makes them look old.
- Typing content into the posts page. It never shows; WordPress replaces it with the post list.
- Leaving the sample content. Delete “Hello world!” and the “Sample Page” before launch, and check that Settings › Reading › Search engine visibility is unticked when you go live.
- Menus that mirror every page. Menus are for the paths visitors need, not a sitemap.
- Changing permalinks after launch without a redirect plan.
Next steps
With the structure in place, design work becomes easier: you know which page is the homepage, which pages need templates and where navigation appears. If you haven’t chosen a theme yet, the SH Themes WordPress theme catalog can be filtered by category, which is a quick way to find demos that already match the pages you just planned.