A few lines of CSS can fix what the theme options can’t: a heading that is slightly too large, a button with the wrong padding, a footer line you want hidden. The CSS itself is rarely the problem. The problem is putting it somewhere that the next theme update overwrites.
This guide shows the safe places to add custom CSS in classic and block themes, how to find the right selector, and how to keep your changes manageable. Screenshots come from a WordPress 7.1.3 test site.
The rule: never edit the parent theme’s files
If you add CSS to the theme’s own style.css or another file inside its folder, it will be overwritten when the theme updates. That is true for free and premium themes alike. Every method below keeps your CSS outside the theme’s files. Our guide to updating premium themes explains why changes to theme files get lost.
Option 1: Additional CSS in the Customizer (classic themes)
For classic themes, the quickest safe place is Appearance › Customize › Additional CSS:
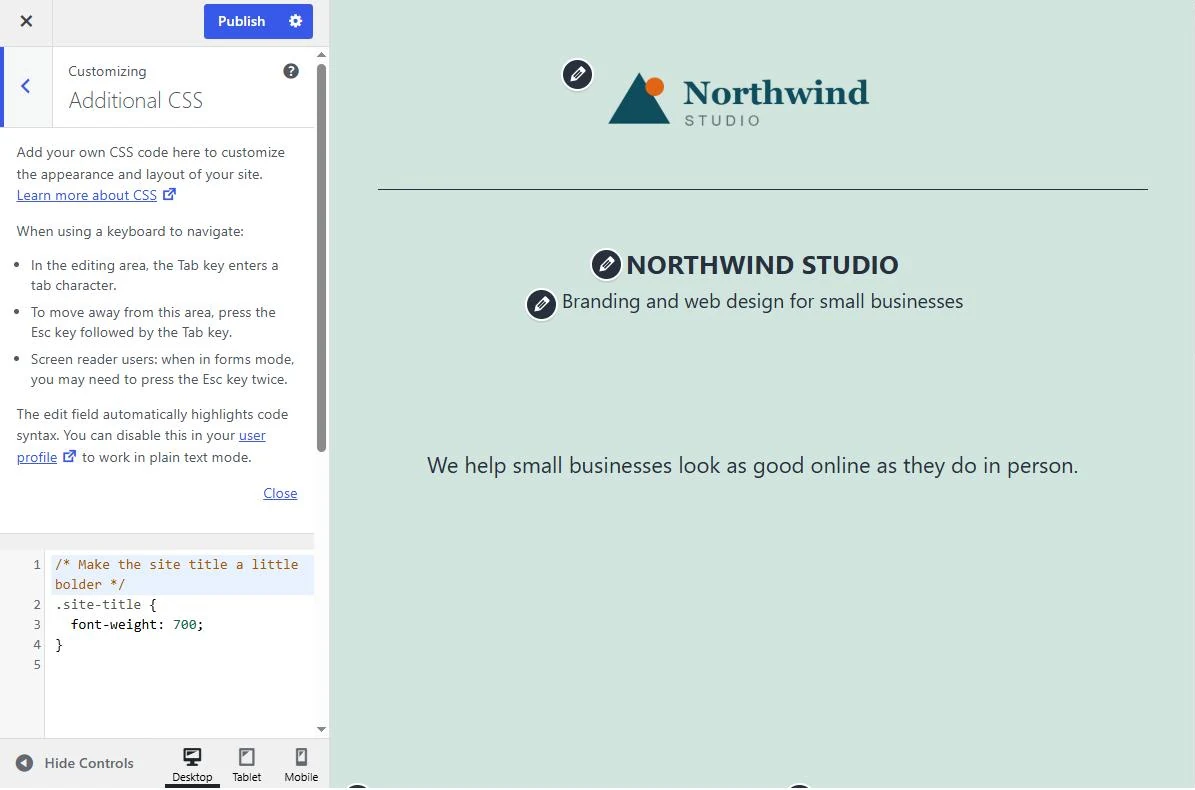
- Type or paste CSS in the box. The preview on the right updates as you type, so you can see the effect before publishing.
- Click Publish to save.
- The editor highlights syntax and flags some errors as you type.
The CSS is stored in the database, not in theme files, so theme updates don’t touch it. One catch: it is saved per theme. If you switch to a different theme, the CSS doesn’t come with you. Copy it to a text file before switching.
Option 2: Additional CSS in Styles (block themes)
Block themes don’t have the Customizer. Instead, go to Appearance › Editor › Styles, open the ⋮ (More) menu at the top of the Styles panel and choose Additional CSS:
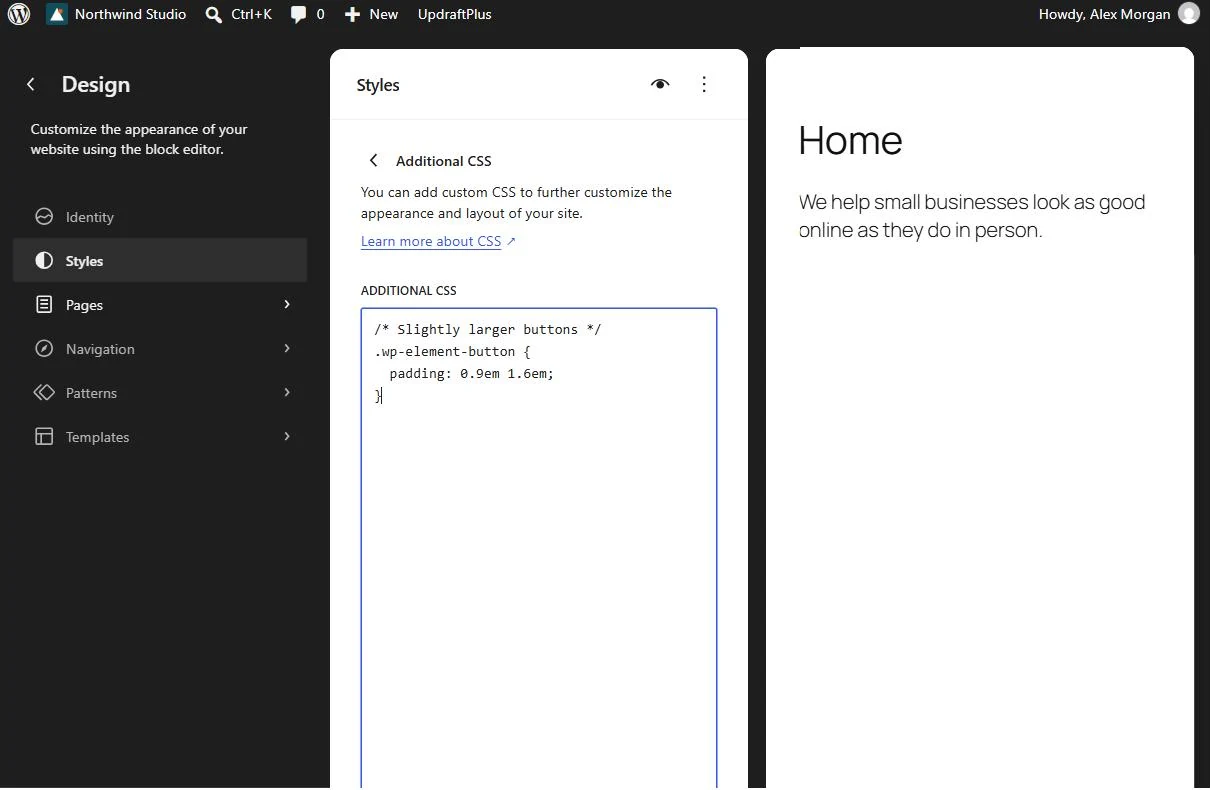
Add your CSS and click Save. As with the Customizer, it is stored in the database and survives theme updates, but belongs to the active theme.
Block themes also let you add CSS for one block type across the whole site: in Styles, open Blocks, choose a block (for example Button) and look for its Additional CSS section. CSS added there applies only to that block type.
Option 3: A child theme
If you have more than a few dozen lines of CSS, or you are also changing templates or PHP, use a child theme. Your CSS goes in the child theme’s style.css, which theme updates never overwrite, and it can be kept in version control. Our child theme guide explains when you need one and how to set it up. Premium themes often include a ready-made child theme in the download.
Option 4: A code snippets plugin
Plugins that manage code snippets let you add CSS (and other code) site-wide, with the option to switch snippets on and off. This is useful when several people manage the site and you want each change labeled separately. Choose a well-maintained plugin and keep the number of snippets small.
What about page builders?
If your site is built with Elementor or another builder, check its own options first. Builders let you change spacing, typography and colors visually, and those settings are easier for the next person to find than CSS. Use custom CSS for the few cases the builder can’t handle, and keep it in one of the places above so it is all in one spot.
Finding the right selector
To change something with CSS, you need its selector, the name CSS uses to target it:
- Right-click the element on your site and choose Inspect.
- The developer tools highlight the HTML. Look for a class name, such as
site-titleorwp-block-button__link. - Try the change live in the Styles panel of the developer tools. When it looks right, copy the rule into your Additional CSS.
Prefer class names that describe the element (.site-title) over long chains of generic elements (div > div > p). They are less likely to break when the theme changes its markup.
Examples
Make the site title bolder in a classic theme:
/* Site title: bolder */
.site-title {
  font-weight: 700;
}
Give buttons a little more padding in a block theme:
/* Buttons: larger click area */
.wp-element-button {
  padding: 0.9em 1.6em;
}
Hide an element only on small screens:
/* Hide the top bar on phones */
@media (max-width: 600px) {
  .top-bar {
    display: none;
  }
}
The last example uses a class name that varies between themes; inspect your own site to find the right one.
Keep it maintainable
- Comment every rule with what it does and why. Six months later you won’t remember.
- Group related rules under headings such as
/* Header */and/* Footer */. - Avoid
!importantunless nothing else works. It makes later changes harder. - Check mobile and desktop after each change.
- Keep a copy of your CSS in a text file or your project notes, especially before switching themes.
- Prefer settings over CSS. If the theme or Styles panel can make the change, use that; our fonts and colors guide shows where.
If your CSS doesn’t seem to work
- Caching: clear the caching plugin, server cache and CDN, then reload in a private window.
- Specificity: the theme’s rule may be more specific than yours. Inspect the element; if your rule is crossed out, make the selector more specific rather than reaching for
!important. - Typos: a missing
}or;can stop every rule after it from working. The Customizer’s editor marks many errors; for other places, paste the CSS into a validator. - Wrong place: CSS added in the Customizer of an inactive theme, or in the Styles of a different block theme, doesn’t apply to the active one.