Images make a theme demo look good, and they are usually the heaviest part of a real site. A homepage with four uncompressed photos straight from a phone or a stock library can easily weigh more than everything else on the page combined. The fix doesn’t need special software: a sensible size, the right format and a little compression before upload, plus a few WordPress settings you should know about.
This guide walks through a workflow you can repeat for every image. Screenshots come from a WordPress 7.1.3 test site.
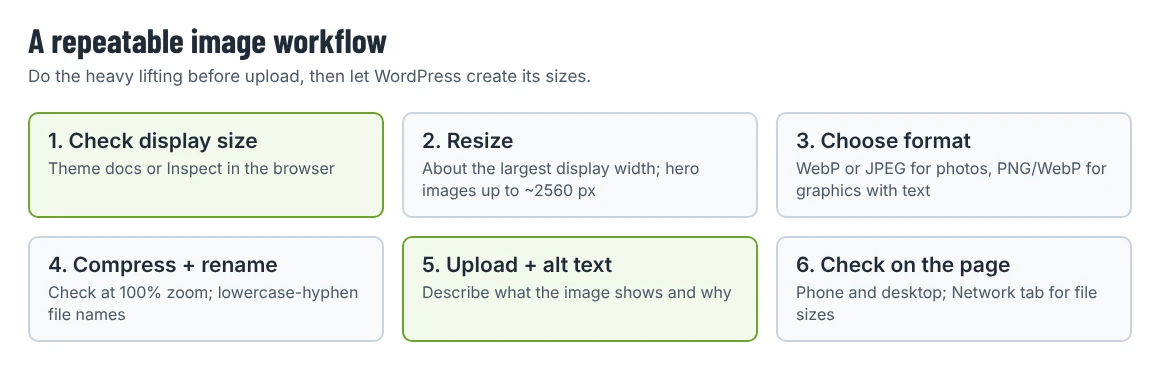
Step 1: Find out what size the theme actually displays
Before resizing anything, find out how large each image appears on the page:
- Theme documentation. Premium themes often list recommended sizes for hero images, blog thumbnails and portfolio items. Check there first.
- The demo. Open the theme demo, right-click an image and choose Inspect in your browser. The rendered size (for example 1290 × 600) tells you the width you need.
- Full-width sections. Hero banners that stretch across the screen are the exception. For those, 1920–2560 pixels wide covers large desktop screens.
As a rule of thumb, upload images about as wide as their largest display size, and no more than twice that if you want them to stay sharp on high-density screens. A 6000-pixel camera original is never the right file to upload.
Step 2: Know what WordPress does with your upload
WordPress creates several copies of every image you upload. The three main sizes are set in Settings › Media:
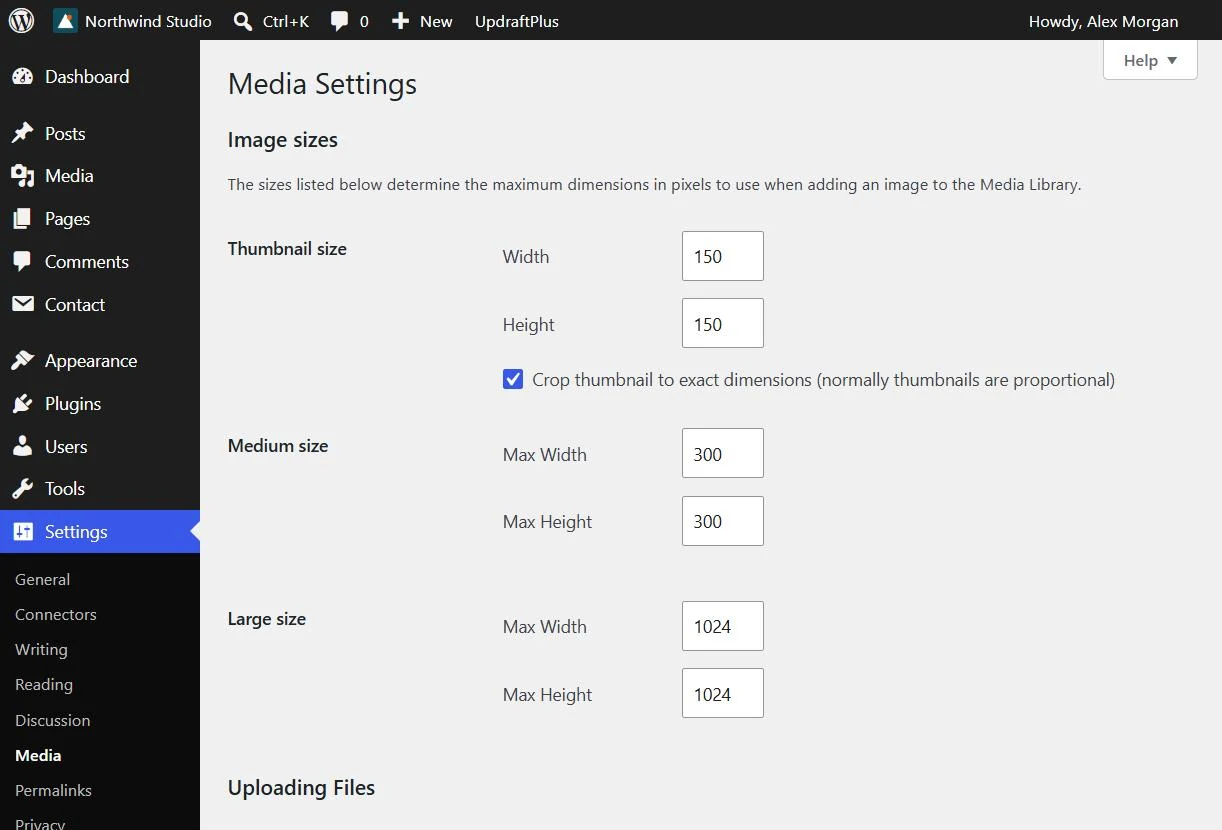
- Thumbnail: 150 × 150 pixels, cropped by default.
- Medium: up to 300 × 300.
- Large: up to 1024 × 1024.
WordPress also creates sizes that aren’t shown on this screen (768 pixels wide, and 1536 and 2048 pixels for larger originals), and themes and plugins often register their own. When we uploaded a 1079 × 783 image to our test site, WordPress generated four extra files: thumbnail, medium, 768-wide and large. On a real site with a feature-rich theme, the number can be much higher.
Two built-in behaviors are worth knowing:
- Big images are scaled down. If you upload an image wider or taller than 2560 pixels, WordPress creates a scaled version with
-scaledin the file name and uses that instead of the original. The original is kept on the server, so it still uses disk space. - Responsive images are automatic. When an image is inserted in content, WordPress adds
srcsetandsizesattributes so browsers can download a smaller copy on smaller screens. That only helps if the theme’s layout tells the browser the right display size, which well-built themes do.
Should you change the sizes in Settings › Media? Usually not. Themes are designed around the defaults or register their own. Change them only if your theme documentation recommends it, and remember that new sizes apply to future uploads only.
Step 3: Choose the format
| Format | Use it for | Notes |
|---|---|---|
| JPEG | Photos | Universal support. Quality 75–85 is usually indistinguishable from the original. |
| WebP | Photos and graphics | Smaller than JPEG at similar quality. WordPress has supported uploading WebP since version 5.8. |
| AVIF | Photos | Often smaller still. WordPress supports it since 6.5, but your server’s image library must support it too. |
| PNG | Screenshots, logos and graphics with transparency | Lossless and often heavy for photos. Don’t use it for photographs. |
| SVG | Logos and icons | Not allowed by WordPress by default for security reasons. Use a plugin that sanitizes SVG files if you need it. |
If you aren’t sure, WebP for photos and PNG or WebP for graphics with text is a safe default.
Step 4: Resize and compress before upload
Do the heavy lifting on your computer, where you can see the result:
- Resize to the width you found in step 1.
- Export in your chosen format at a moderate quality setting. Compare the result side by side with the original at 100% zoom.
- Rename the file to something descriptive and lowercase with hyphens, for example
dental-clinic-reception-desk.webpinstead ofIMG_4482.jpg. WordPress uses the file name as the default title, and a readable name makes the Media Library easier to search. - Remove location data from photos taken on phones if the location is private.
Free desktop tools, your image editor’s “export for web” option or a web-based compressor all work. The important thing is to do it consistently.
Step 5: Add alt text when you upload
Alt text describes the image for people using screen readers and for search engines. Add it in the Alternative Text field in the attachment details:
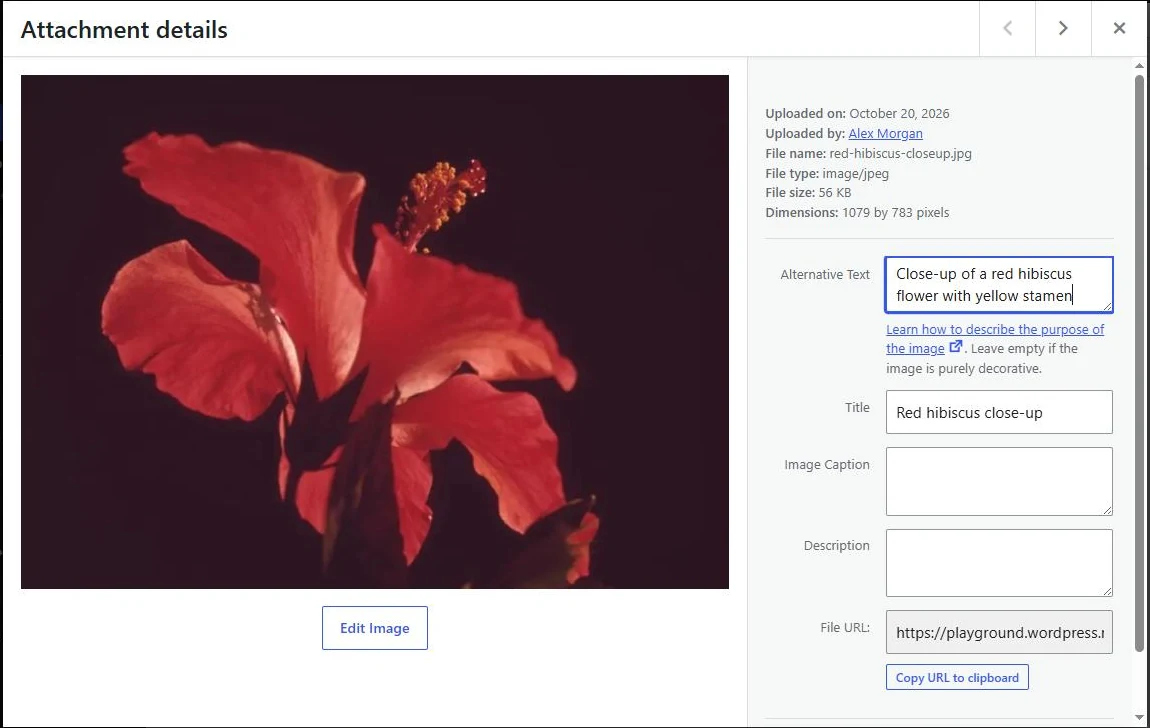
- Describe what the image shows and why it is on the page, in a sentence or less.
- Don’t start with “Image of” and don’t stuff keywords.
- Leave it empty for purely decorative images, as the WordPress screen itself suggests.
- If the image contains text (a banner, a chart), the alt text should include that text or its point.
Step 6: Consider an optimization plugin
If several people upload images, or you have a large existing library, a plugin can compress images automatically on upload and convert them to WebP or AVIF. Widely used options on WordPress.org include EWWW Image Optimizer and Imagify, each with 1,000,000+ active installations as of 20 October 2026. Check what the free version does on your server and what needs a paid plan or an external service, and test on a staging copy first.
Two cautions:
- Don’t stack plugins. One image optimization plugin is enough. Two can process the same files twice.
- Thumbnails don’t regenerate by themselves. If you change themes or image sizes, old uploads keep their old sizes. Tools exist to regenerate them, but check that the tool is maintained and tested with your WordPress version before you run it. Back up first.
Step 7: Check the result on the page
Once images are on the page, check them where visitors see them:
- Open the page on a phone and on a desktop. Images should be sharp but not slow to appear.
- In your browser’s developer tools, the Network tab shows the size of each image actually downloaded. Look for anything over a few hundred kilobytes.
- Run the page through PageSpeed Insights and look at the image-related suggestions. We cover the bigger picture in our guide to Core Web Vitals.
When the demo looks better than your site
Theme demos use carefully chosen, consistently cropped photos. If your pages look uneven after importing a demo, the cause is often images of different proportions in the same grid. Crop images for each section to the same aspect ratio before uploading. We cover other reasons in our guide to why a site doesn’t look like the theme demo.
Your logo and site icon have their own size rules; see our guide to logos, site icons and taglines.
Image checklist
- Width matches the largest display size (hero images up to about 2560 pixels).
- Photos in WebP or JPEG, graphics with text in PNG or WebP.
- Compressed and checked at 100% zoom.
- Descriptive, lowercase file name with hyphens.
- Alt text added, or left empty for decorative images.
- One optimization plugin at most, tested on staging.